If you are looking for an effective way to link external email in Outlook or Gmail to Salesforce record, then you have come to the right place. In this blog, we will show how to quickly step up the email to the Salesforce feature and get the email reply in Salesforce under the same contact form you’ve sent the email.
With Email to Salesforce, you can automatically log emails that you send from third-party email accounts as activities on lead and contact records in Salesforce. Once Salesforce Email is enabled, users can access the My Salesforce Email page to view their unique Salesforce email and customize their settings.
Email To Salesforce Process
When sending an email from an external email application, use Email to Salesforce to automatically associate that email with your leads, contacts, opportunities, and other specific Salesforce records. When composing, forwarding, or replying to an email, type the custom email address into Salesforce in the BCC field (or any other recipient field). And then Salesforce receives a copy of the email.
Based on the configuration, Salesforce adds the email to the Activity History related list of the record whose email address matches the recipient’s email address or the My Unresolved Items page. From the My Unresolved Items page, you can manually assign the email to a record. Emails that are not yet assigned will also appear in your open task list.
Steps To Set Up Email To Salesforce
Step 1: Activate Email To Salesforce:
- Login to your Salesforce account and click on Setup.
- Search Email to salesforce and click on the Edit button.
- Check the Active checkbox and click on save.

Step 2: Create An Apex Class To Handle Email Replies:
Create a new apex class and copy the following code.
<global class CreateEmailActivity implements messaging.InboundEmailHandler {
global messaging.InboundEmailresult handleInboundEmail(messaging.InboundEmail email, messaging.InboundEnvelope envelope){
try{
List<contact> contacts = new List<contact> ();
List<Attachment> attachments = new List<Attachment>();
List<Messaging.EmailFileAttachment> attachmentList = new List<Messaging.EmailFileAttachment>();
List<string> toEmailAddresss = new List<string>();
List<string> ccEmailAddresss = new List<string>();
system.debug(’email’ + email);
messaging.InboundEmailresult result = new messaging.InboundEmailresult();
string senderName = email.fromname;
String fromEmailAddress = email.fromAddress;
toEmailAddresss = email.toAddresses;
ccEmailAddresss = email.ccAddresses;
system.debug(‘fromEmailAddress>>>>’+fromEmailAddress);
Messaging.InboundEmail.BinaryAttachment[] binaryAttachments = email.binaryAttachments;
contacts = [select id from Contact where email= :fromEmailAddress LIMIT 1];
String htmlBody = email.htmlBody;
String taskSubject = email.subject;
System.debug(‘htmlBody:’ + htmlBody);
if(contacts.size() > 0){
/****************** Forward mail to current user ******************************/
Messaging.SingleEmailMessage message = new Messaging.SingleEmailMessage();
if(binaryAttachments != Null && binaryAttachments.size() > 0){
for (integer i = 0 ; i < binaryAttachments.size() ; i++) {
Messaging.EmailFileAttachment attach = new Messaging.EmailFileAttachment();
attach.filename = binaryAttachments[i].Filename;
attach.body =binaryAttachments[i].Body;
attachmentList.add(attach);
}
}
List<string> toAddress = new List<string>();
toAddress.add(UserInfo.getUserEmail());
if(attachmentList.size()>0){
message.setFileAttachments(attachmentList);
}
message.setToAddresses(toAddress);
message.setSubject(taskSubject);
message.setHtmlBody(htmlBody);
message.setReplyTo(fromEmailAddress);
message.setSaveAsActivity(true);
message.setTreatTargetObjectAsRecipient(true);
message.setTargetObjectId(contacts[0].Id);
List<Messaging.SingleEmailMessage> messages = new List<Messaging.SingleEmailMessage>();
messages.add(message);
if(!System.Test.isRunningTest()){
Messaging.SendEmailResult[] results = Messaging.sendEmail(messages);
}
List<Emailmessage> emailmessageList = new List<Emailmessage>();
List<EmailMessageRelation> emrObj = new List<EmailMessageRelation>();
if(Schema.sObjectType.EmailMessageRelation.isQueryable()){
emrObj = [SELECT Id, EmailMessageId, CreatedDate FROM EmailMessageRelation WHERE RelationId =: contacts[0].Id ORDER BY CreatedDate Desc LIMIT 1];
}
if(Schema.sObjectType.Emailmessage.isQueryable()){
emailmessageList = [SELECT Id , ActivityId, CreatedDate FROM Emailmessage WHERE Id =: emrObj[0].EmailMessageId LIMIT 1];
if(binaryAttachments != Null && binaryAttachments.size() > 0){
for (integer i = 0 ; i < binaryAttachments.size() ; i++) {
Attachment attachment = new Attachment();
if(emailmessageList.size()> 0){
attachment.ParentId = emailmessageList[0].Id;
}
attachment.Name = binaryAttachments[i].Filename;
attachment.Body = binaryAttachments[i].Body;
attachments.add(attachment);
}
if(attachments.size() >0){
insert attachments;
}
}
}
if(emailmessageList.size()> 0){
emailmessageList[0].FromName = senderName;
emailmessageList[0].FromAddress = fromEmailAddress;
if (toEmailAddresss.size()>0 ) {
emailmessageList[0].ToAddress = toEmailAddresss[0] + ‘,’ +fromEmailAddress;
}
update emailmessageList[0];
system.debug(’emailMessageObj Id : ‘ + emailmessageList[0]);
}
}
}catch(Exception e){
System.debug(‘Exception :’ + e.getMessage());
System.debug(‘Line Number :’ + e.getLineNumber());
}
return null;
}
}>
- Save the Apex class.
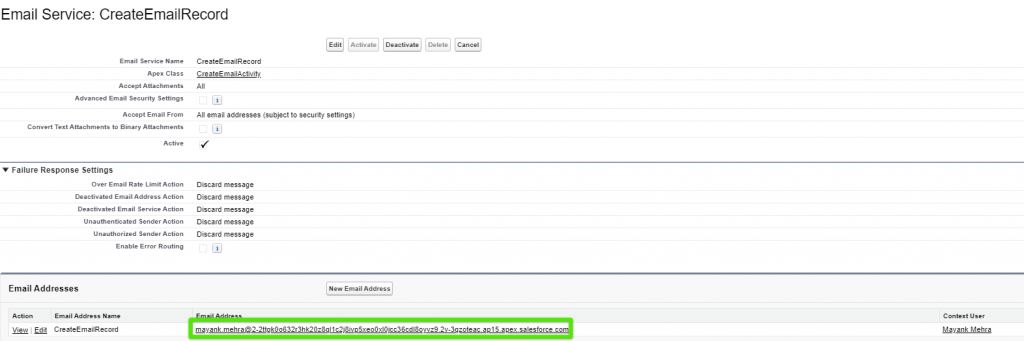
Step 3: Create Email Services:
- Search Email Services in the Quick Find box.
- Click on New Email Services.
- Fill in the details as shown in the screenshot below.
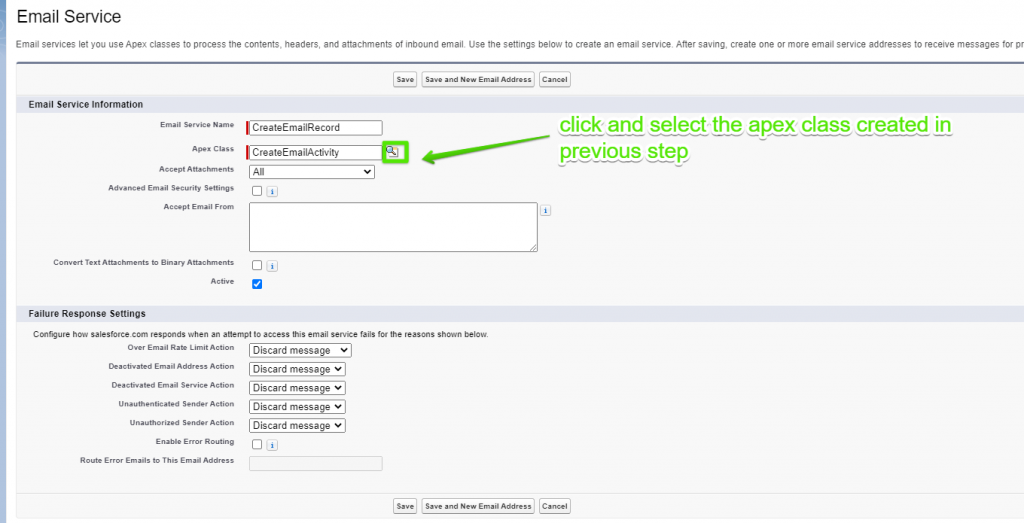
- Click on the ‘Save and New Email Address’ button.
- Fill in the details as shown below screenshot.
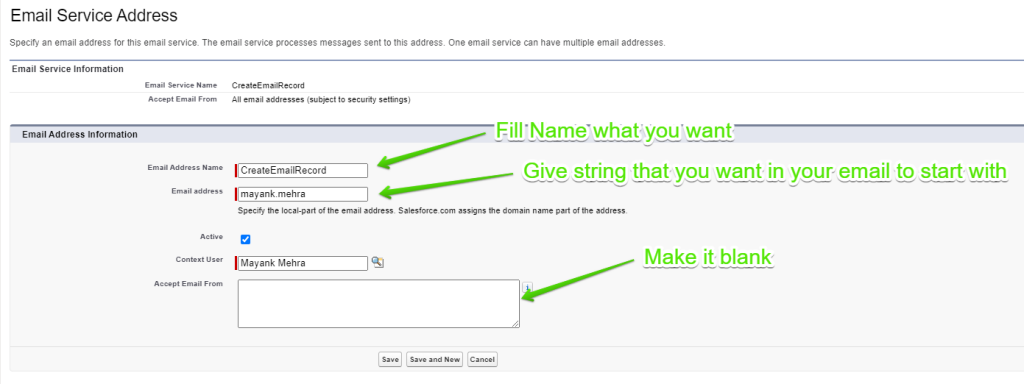
- Click on the save button and copy the email address highlighted in the screenshot below.
Step 4: Update My Email Settings:
- Click on the Avatar icon in the top right corner and then click on settings.
- Search My Email Settings in Quick Find.
- Set debug logs that are required to see verify the new email address.
- Paste the email address that you have copied in the previous step in the Email Address Field.

- Click on the save button and open the Email To ApexHandler debug log.

- Copy the full verification link as shown in the screenshot.
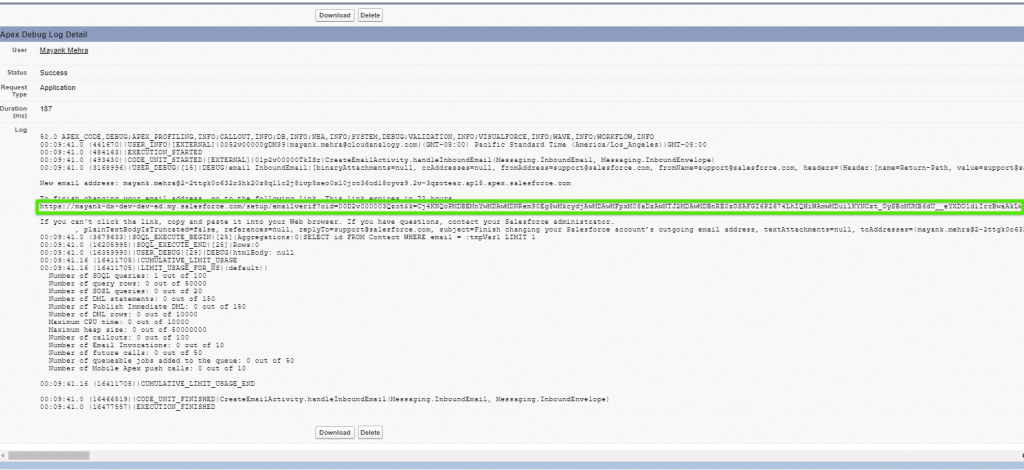
- Open the copied link in the new tab and click on Continue.
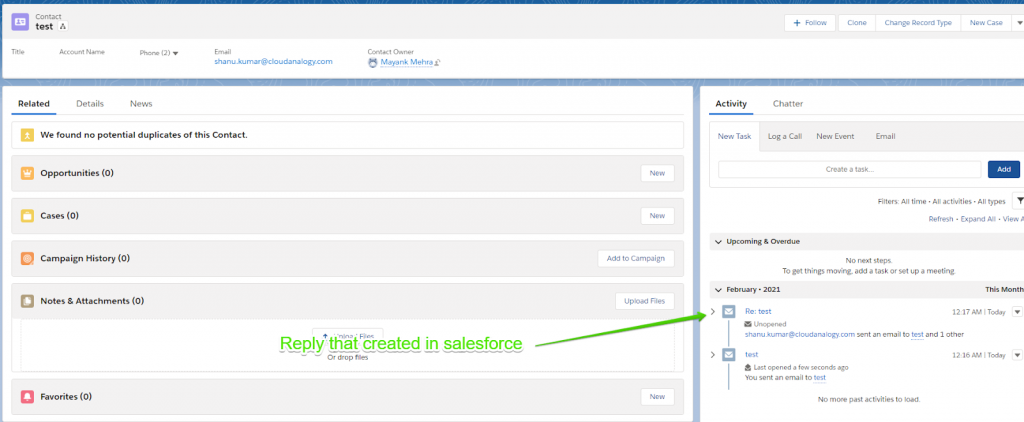
Now your Email to Salesforce feature setup is done. To test this feature, send an email to any contact record whose email address field is filled. Then ask that email owner to reply in the same mail chain. After replied from Gmail, refresh the same contact record, and you can see the reply email activity in the activity section as shown below:
Considerations For Using Email To Salesforce
- The maximum no. of email addresses that Email to Salesforce can match is 50. Email to Salesforce processes only the first 50 unique addresses in the email if the combined number of addresses in the To and CC fields exceeds the limit.
2. Emails to Salesforce can generate a maximum of 50 email activities for each email you receive. Up to 50 contacts can be linked to each email task record.
3. In Salesforce Classic, the size limit for files attached directly to related lists is 25MB. In Lightning Experience, the limit for the size of files attached directly to related lists is 2 GB. The maximum email size is 25MB, and the maximum number of attachments is 5MB. For each matched record, all email attachments are duplicated, which affects your data size limit. Any attachments that are not added will be listed in the confirmation email you receive from Salesforce.
- Email text and HTML code reduced to 32 KB.
Benefits Of Email To Salesforce Feature
- Availability of history information in Salesforce.
- User-friendly feature that can enrich record information.
- It helps make better future decisions. For example, if opportunities are lost, history information will be available about subsequent transactions in the same account.
You spend a lot of time working on email and scheduling appointments on your calendar. After Salesforce admins set up these integration products, you can work with Salesforce directly from a Microsoft or Google application such as Microsoft Outlook®, Gmail, or Google Calendar. You can use Email to Salesforce to track sales-related emails in Salesforce. Relate emails that you send with external email applications to leads, contacts, opportunities, and other specific Salesforce records. When an email is sent to Salesforce via email to Salesforce or Salesforce for Outlook to Salesforce, multiple emails are assigned to related records based on your email to Salesforce settings.